principles for keyboard layouts
I spent a few months iterating on a keyboard layout that I now like a lot, so I wanted to share my take-aways about the process and the principles I found useful along the way.
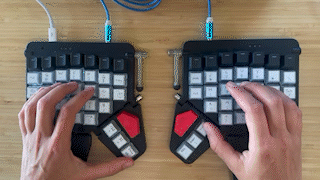
As you see in the top gif, I’m currently using a moonlander keyboard. This makes it extra-easy to iterate on keyboard layouts, however it’s also possible to redefine the keymapping on any keyboard, including the one built into your laptop.
Why a custom keyboard layout? The drama-filled history of dvorak should teach us that it is hard to measure and predict the benefits of layouts that intuitively seem more reasonable. To be honest, I mostly have a custom layout because I like it, and as I hope is evident in the rest of this blogpost, I enjoyed the process of thinking through which keys I type when and setting up the layout. It’s an aesthetic preference, tinged with a little intuition about ergonomics.
I like to think about objects, how they’re made, how I interact with them, and how I can make or customize or modify them. I think it’s fun to get clarity on how well or poorly an object is suited to how you use it.
For instance, here’s a thing I find absurd: I spend a lot of time typing special characters, and on a standard keyboard they’re terribly laid out.
To type special characters I either have to use my pinkies, move my hand off the home row, or both. My accuracy typing special characters is pretty bad in spite of spending a lot of time typing them, and I definitely can’t write code without looking at my keyboard.
This terrible layout isn’t a catastrophe; I can and do type all these poorly laid out special characters on a keyboard with a standard layout. It’s just that it could be so much better with some thought put into it: this is what makes this an aesthetically satisfying exercise.
To give you a visual comparison, here are three clips of hands typing this python function definition. I chose the code sample by taking the popular open source library numpy and choosing a function at random as a decent representation of standard python code. Look at all the special characters!
# Note: cross is the numpy top-level namespace, not np.linalg
def cross(x1: Array, x2: Array, /, *, axis: int = -1) -> Array:
    """
    Array API compatible wrapper for :py:func:`np.cross <numpy.cross>`.
    See its docstring for more information.
    """
    if x1.dtype not in _numeric_dtypes or x2.dtype not in _numeric_dtypes:
        raise TypeError('Only numeric dtypes are allowed in cross')
    # Note: this is different from np.cross(), which broadcasts
    if x1.shape != x2.shape:
Top-to-bottom:
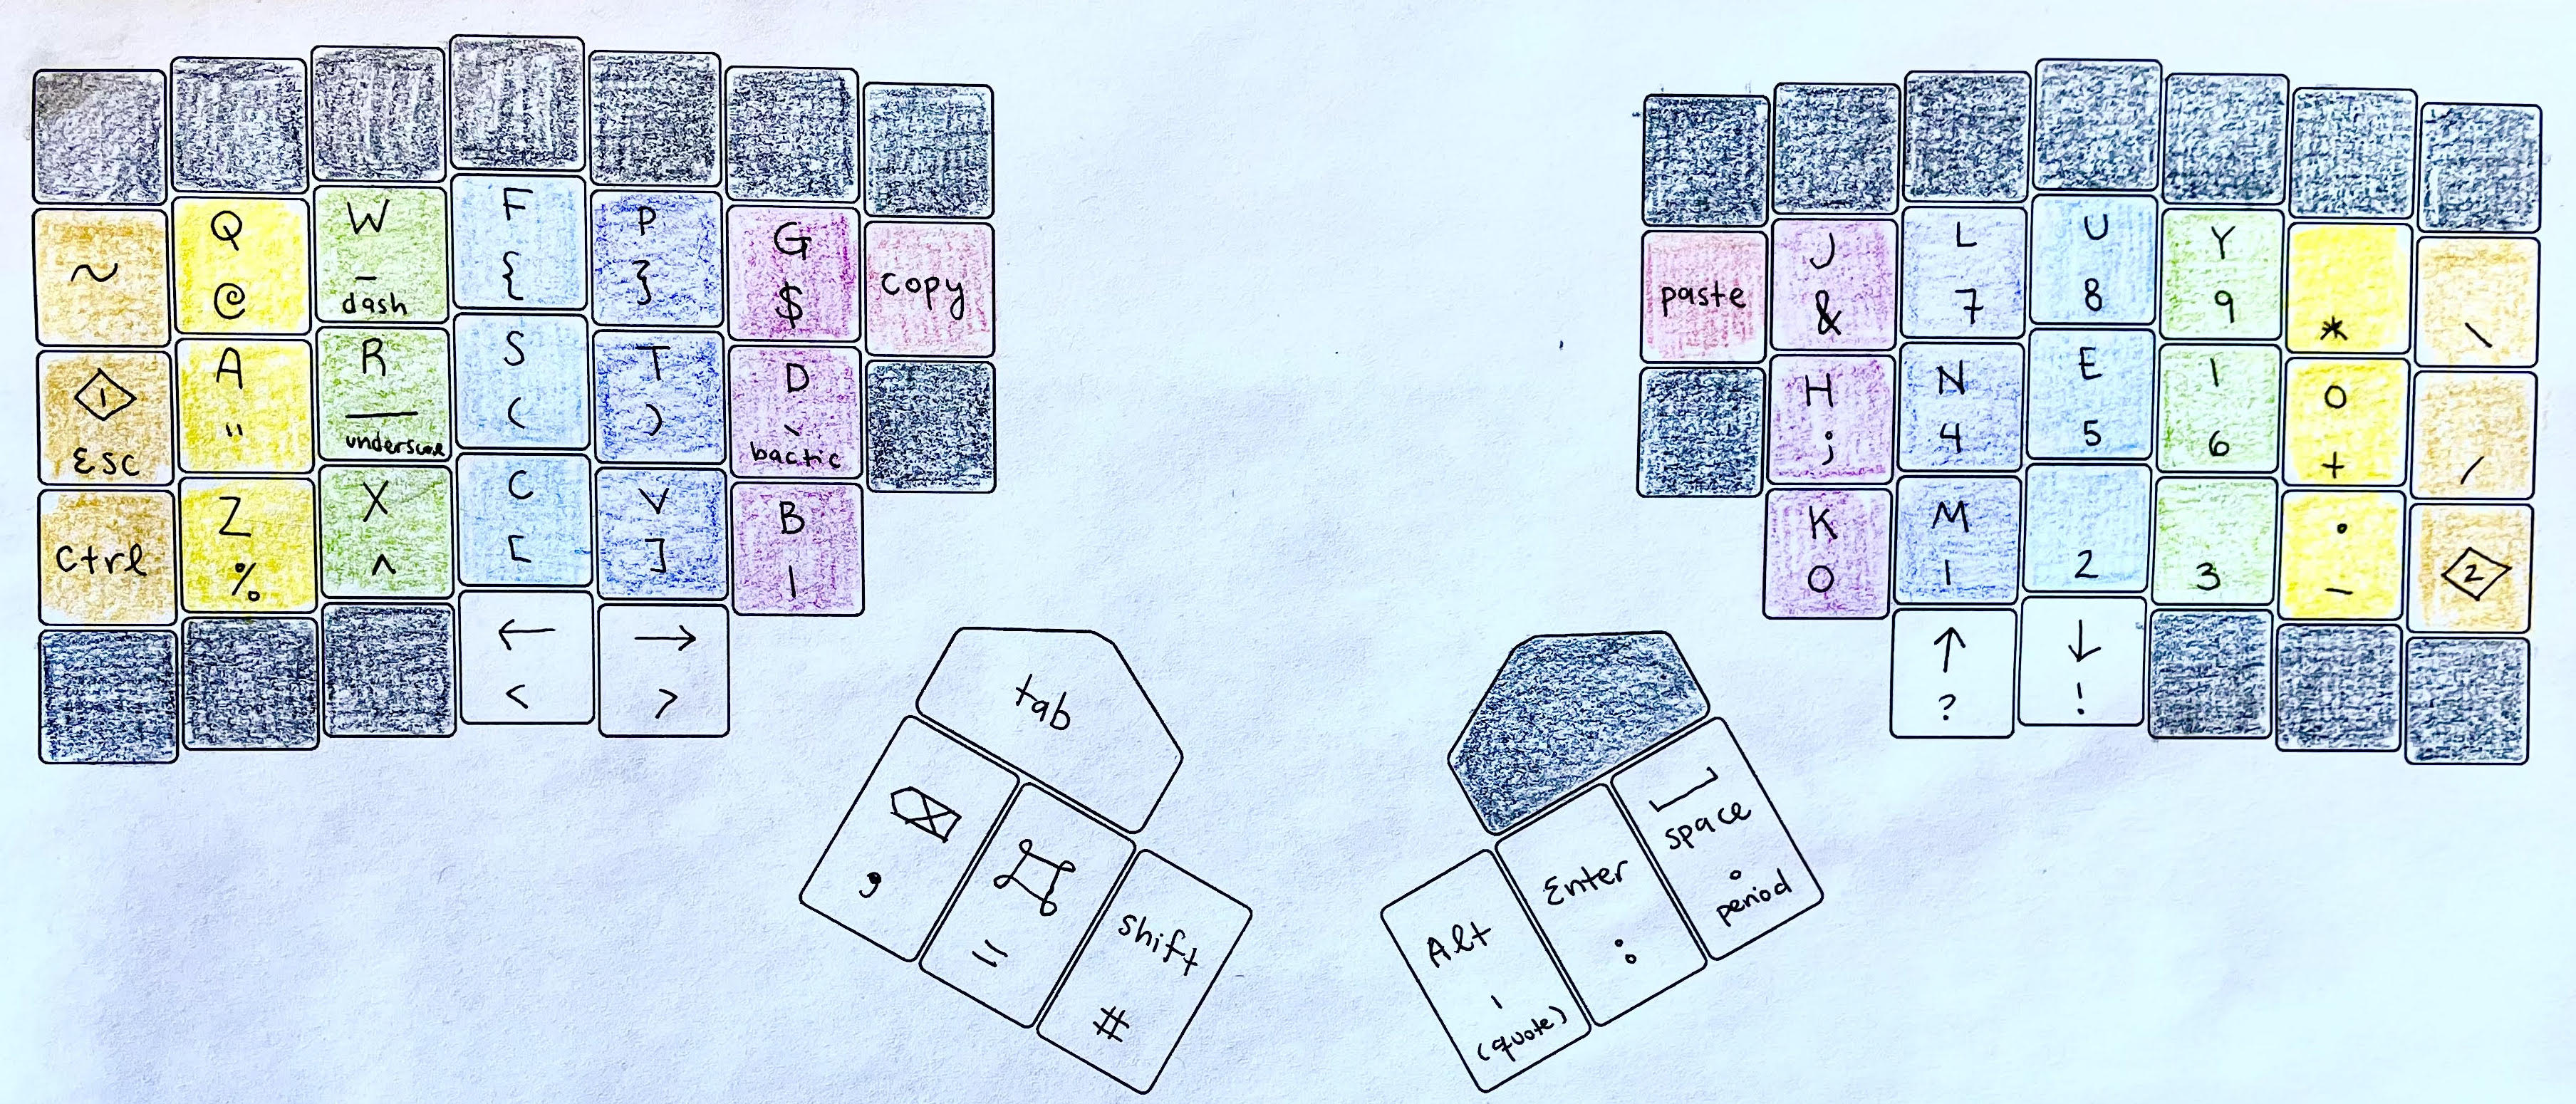
1) me typing on my custom layout on my moonlander keyboard. I have two layers defined: an alphabetic layer which is layed out using the colemak layout, and a numeric + special char layer. You can tell when I am typing in the special character layer because the small LEDS at the top of my keyboard turn on blue while I am in that layer.
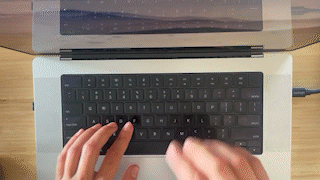
2) me typing on my laptop keyboard. Here I’m typing with the same colemak layout for the alphabetic characters but with the standard special char + numeric layout.
3) my partner-in-crime typing on a standard qwerty layout.

Here is what I notice when I look at these recordings:
- the most drastic difference is (as expected, by design) between my layout (top video) and the standard layout (bottom video).
- on my layout I am nearly constantly using my thumbs. I take this as a sign that I’ve correctly placed the most commonly typed keys in the thumb clusters.
- on my layout my hands stay fairly steady on the home row (top video). Compare this to how much my hands move to reach the special characters on my laptop keyboard (middle video) and how much my partner’s hands move in the standard layout (bottom video).
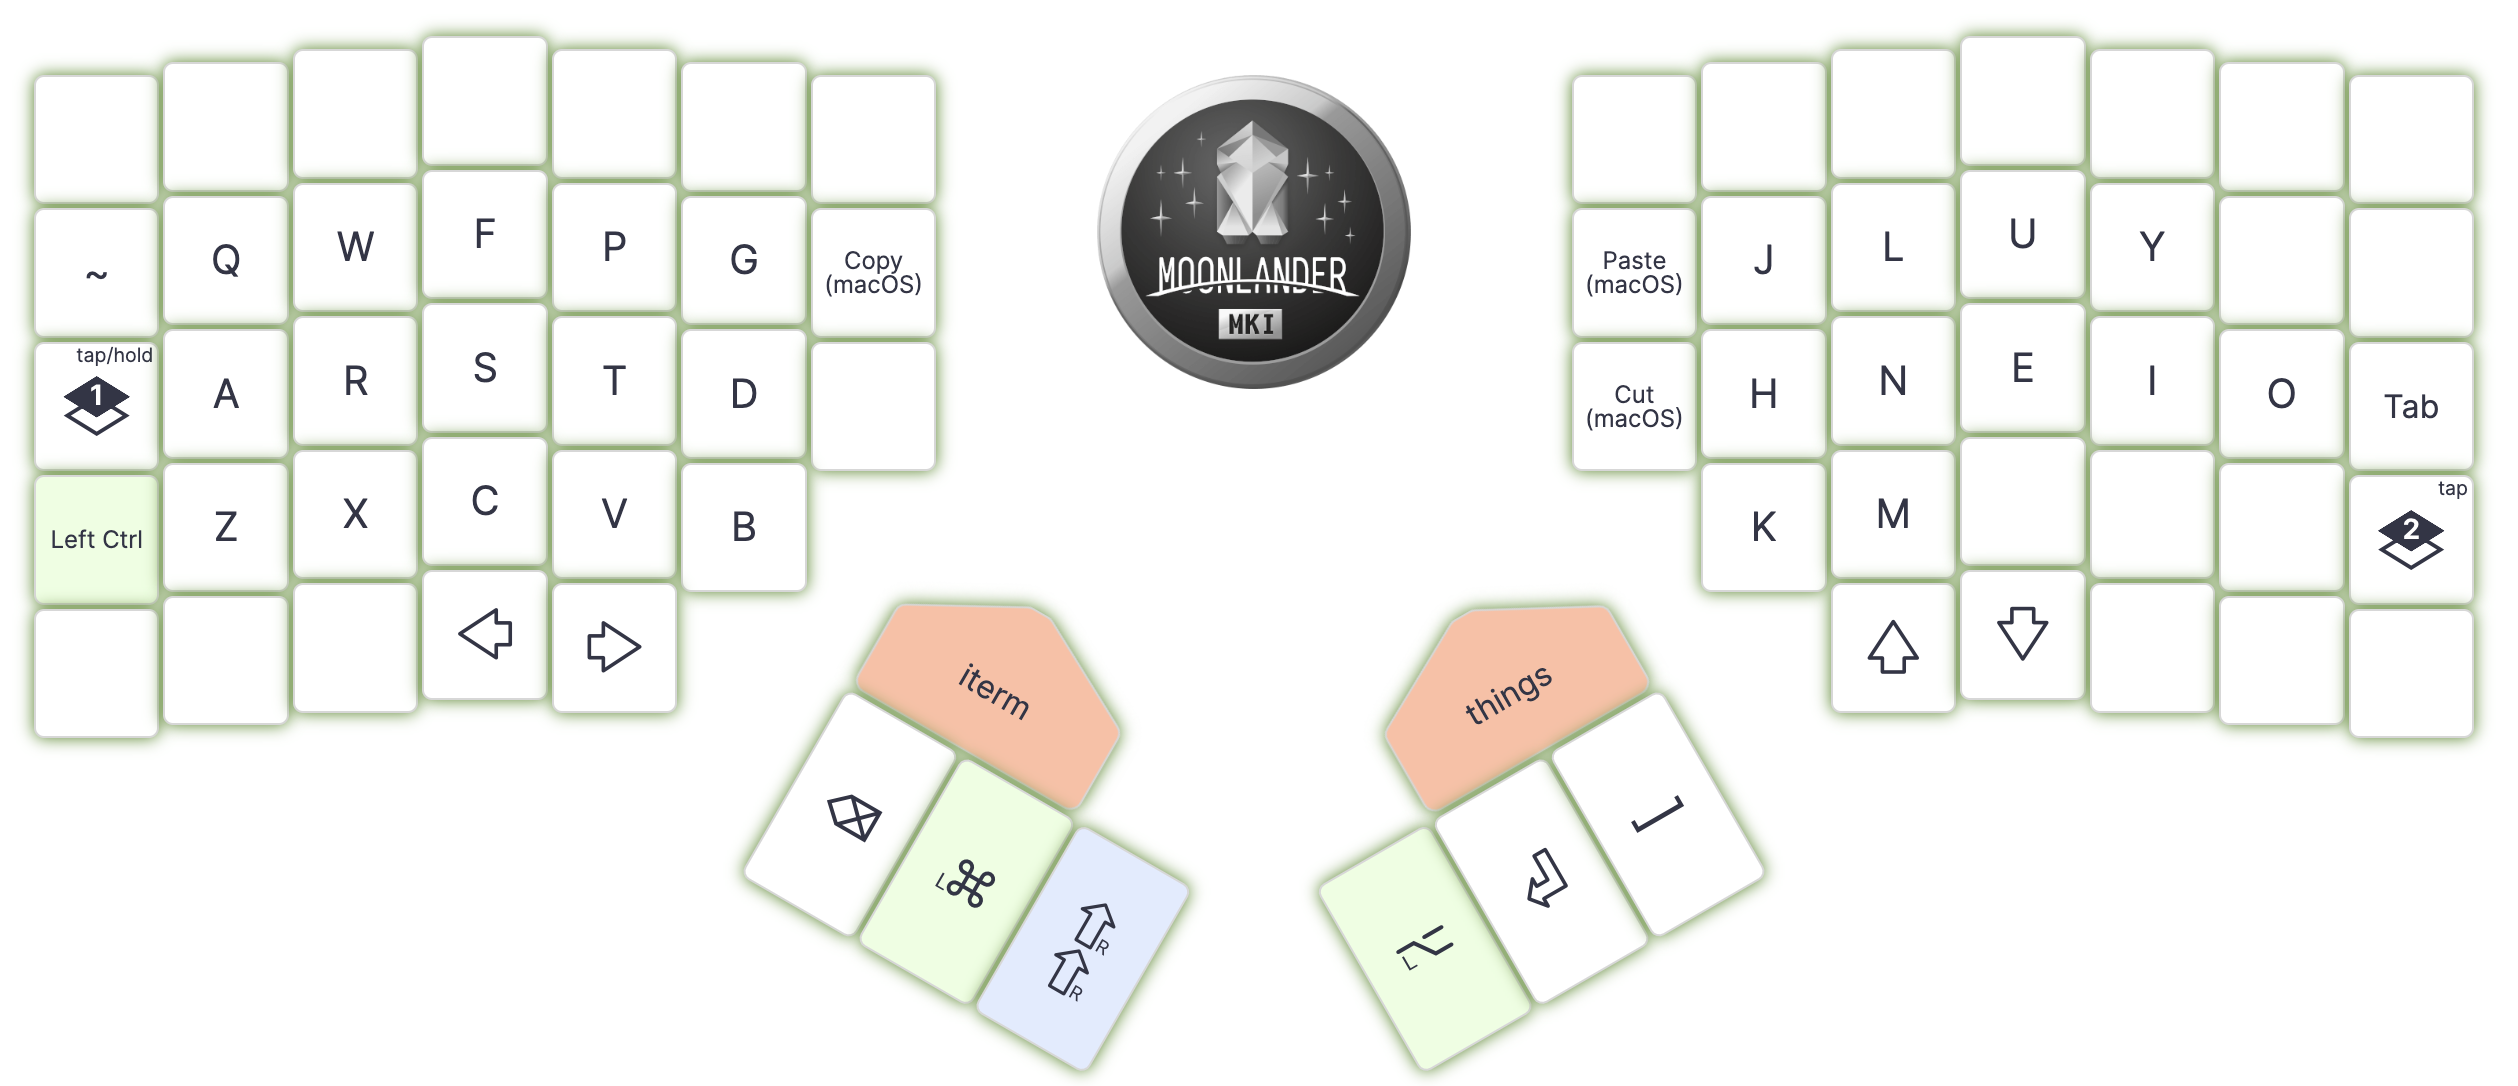
Quick tour of my layout
My layout has an alphabet base layer, a special character layer, and a tiny third audio control layer. Here they are:
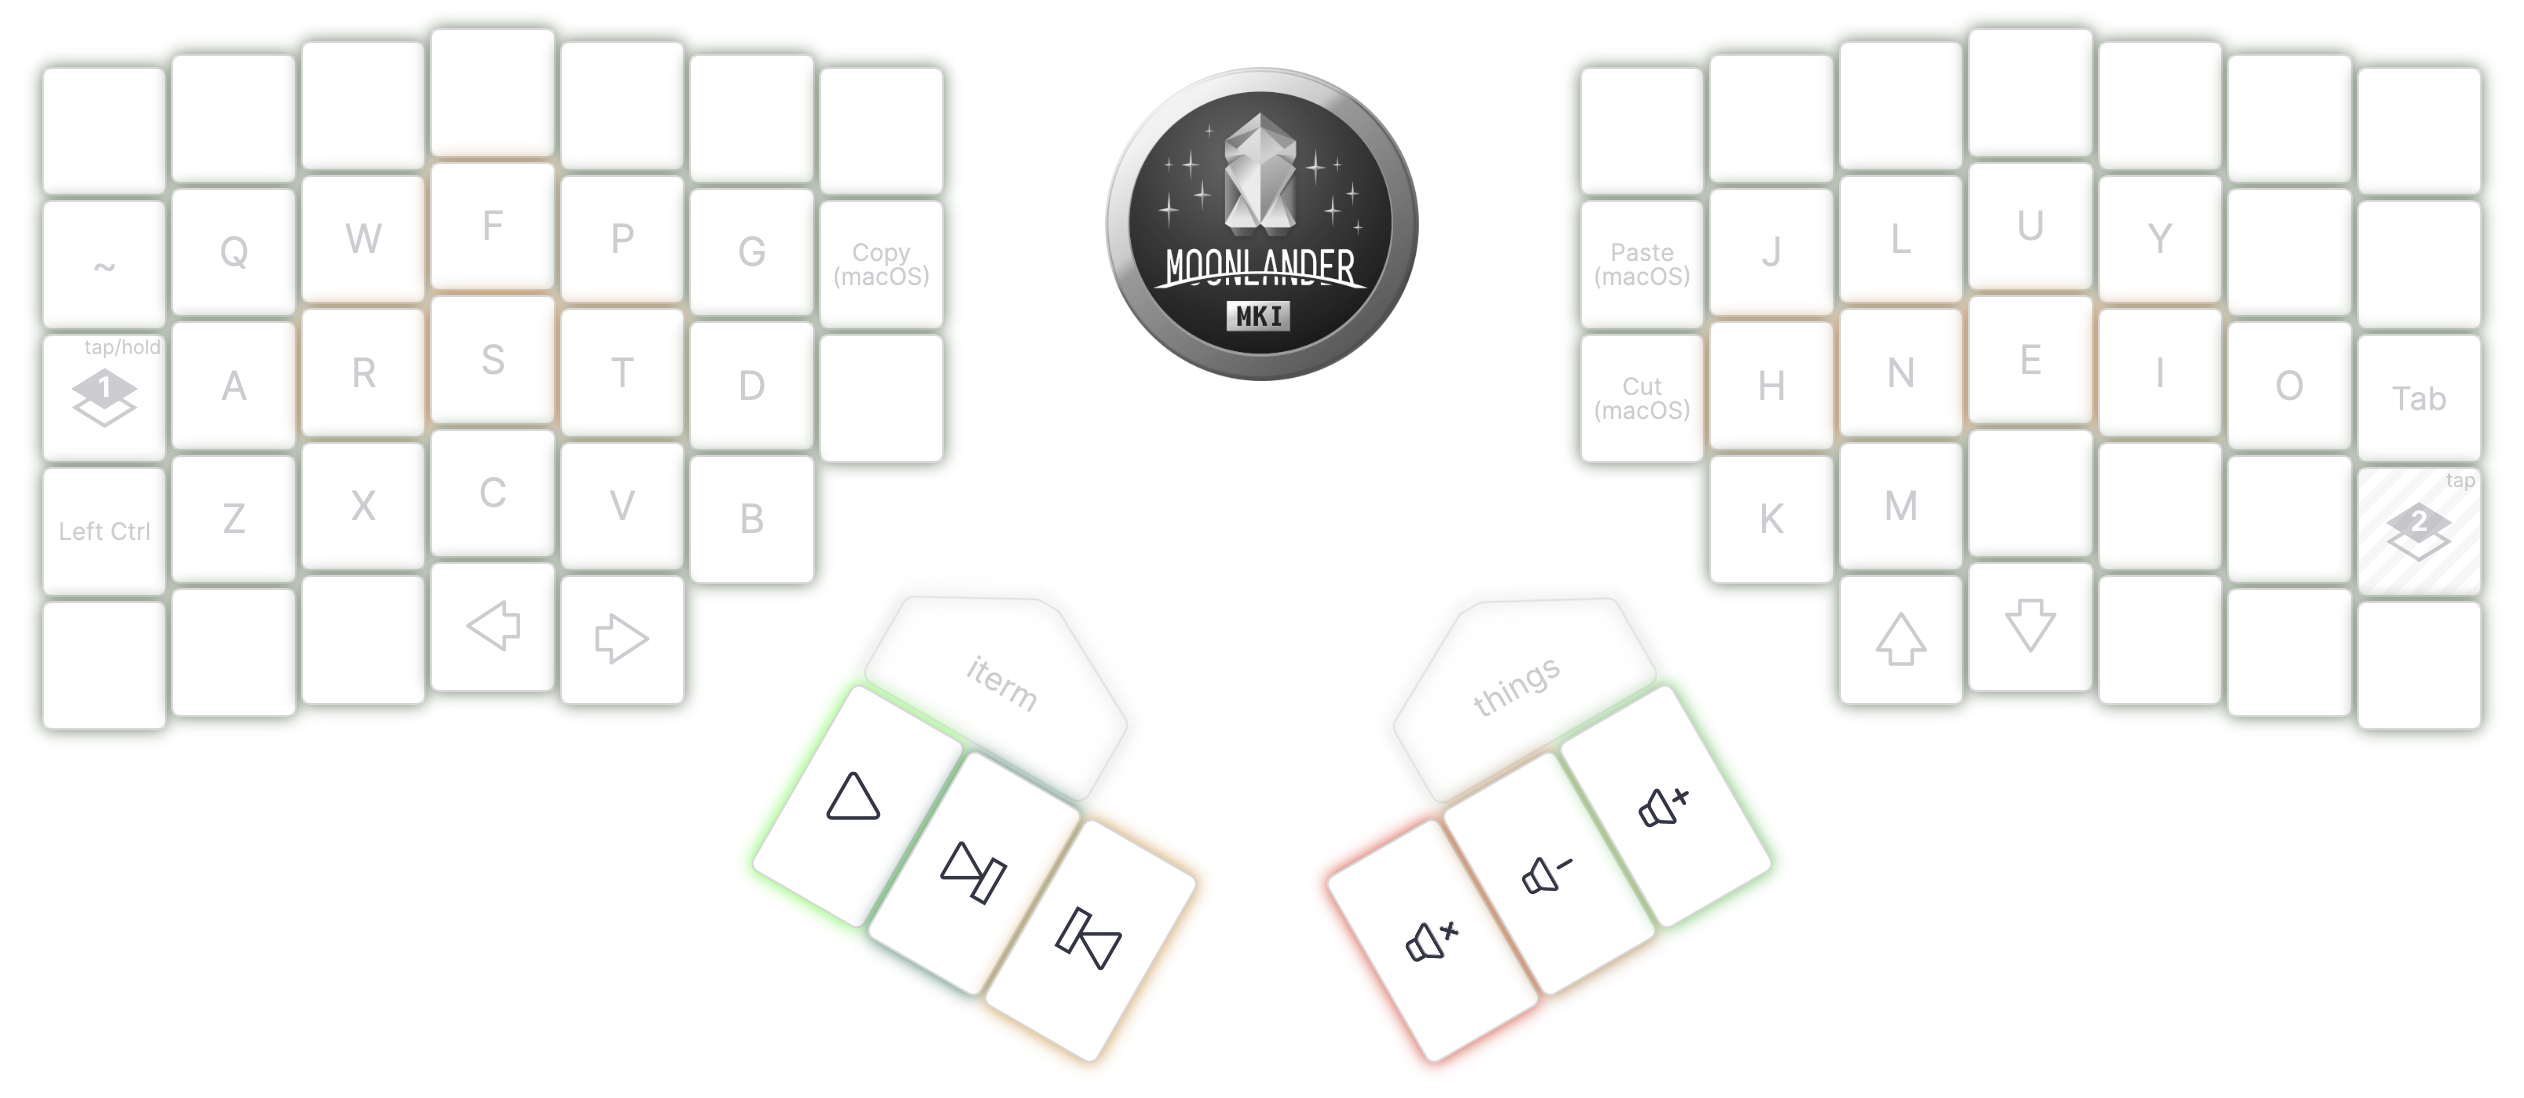
Layer 0 is the alphabet layer, laid out in colemak:
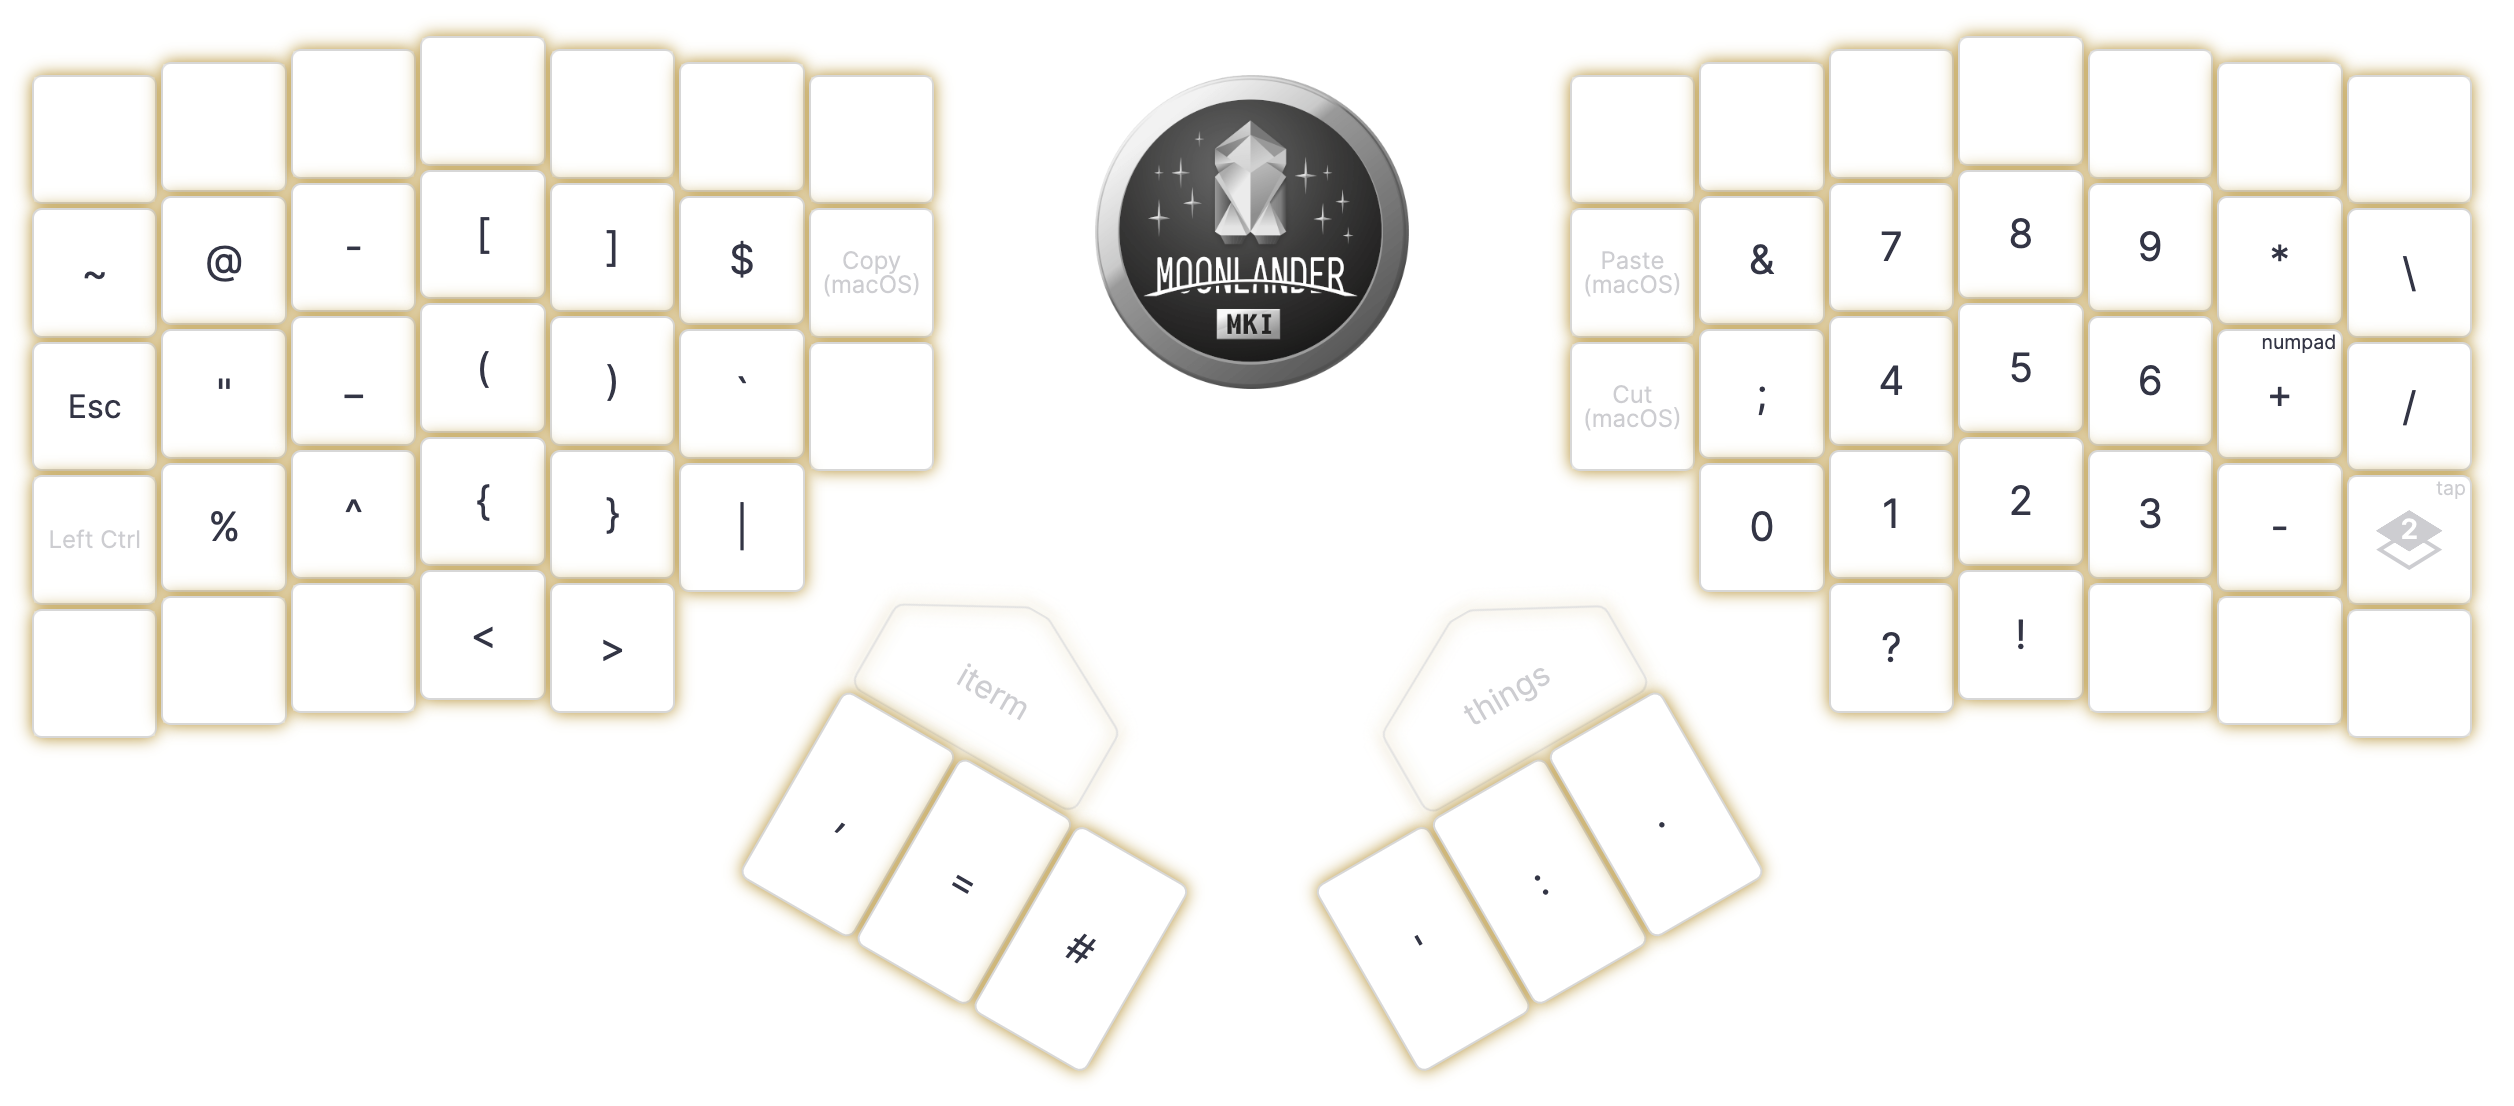
Layer 1 is the numeric + special key layer. I set up my special char layer by starting out with the default character layout, and riffing on it to fit the patterns I often typed:
Layer 2 is my tiny audio control layer, only the thumb cluster keys are mapped:
Principles for keyboard layouts
I only use keys I can reach from the homerow
Here is a photo of my keyboard– notice that the keys that are in far-off places have black blank keycaps on them. They are unmapped because I don’t need so many keys and I don’t like stretching:
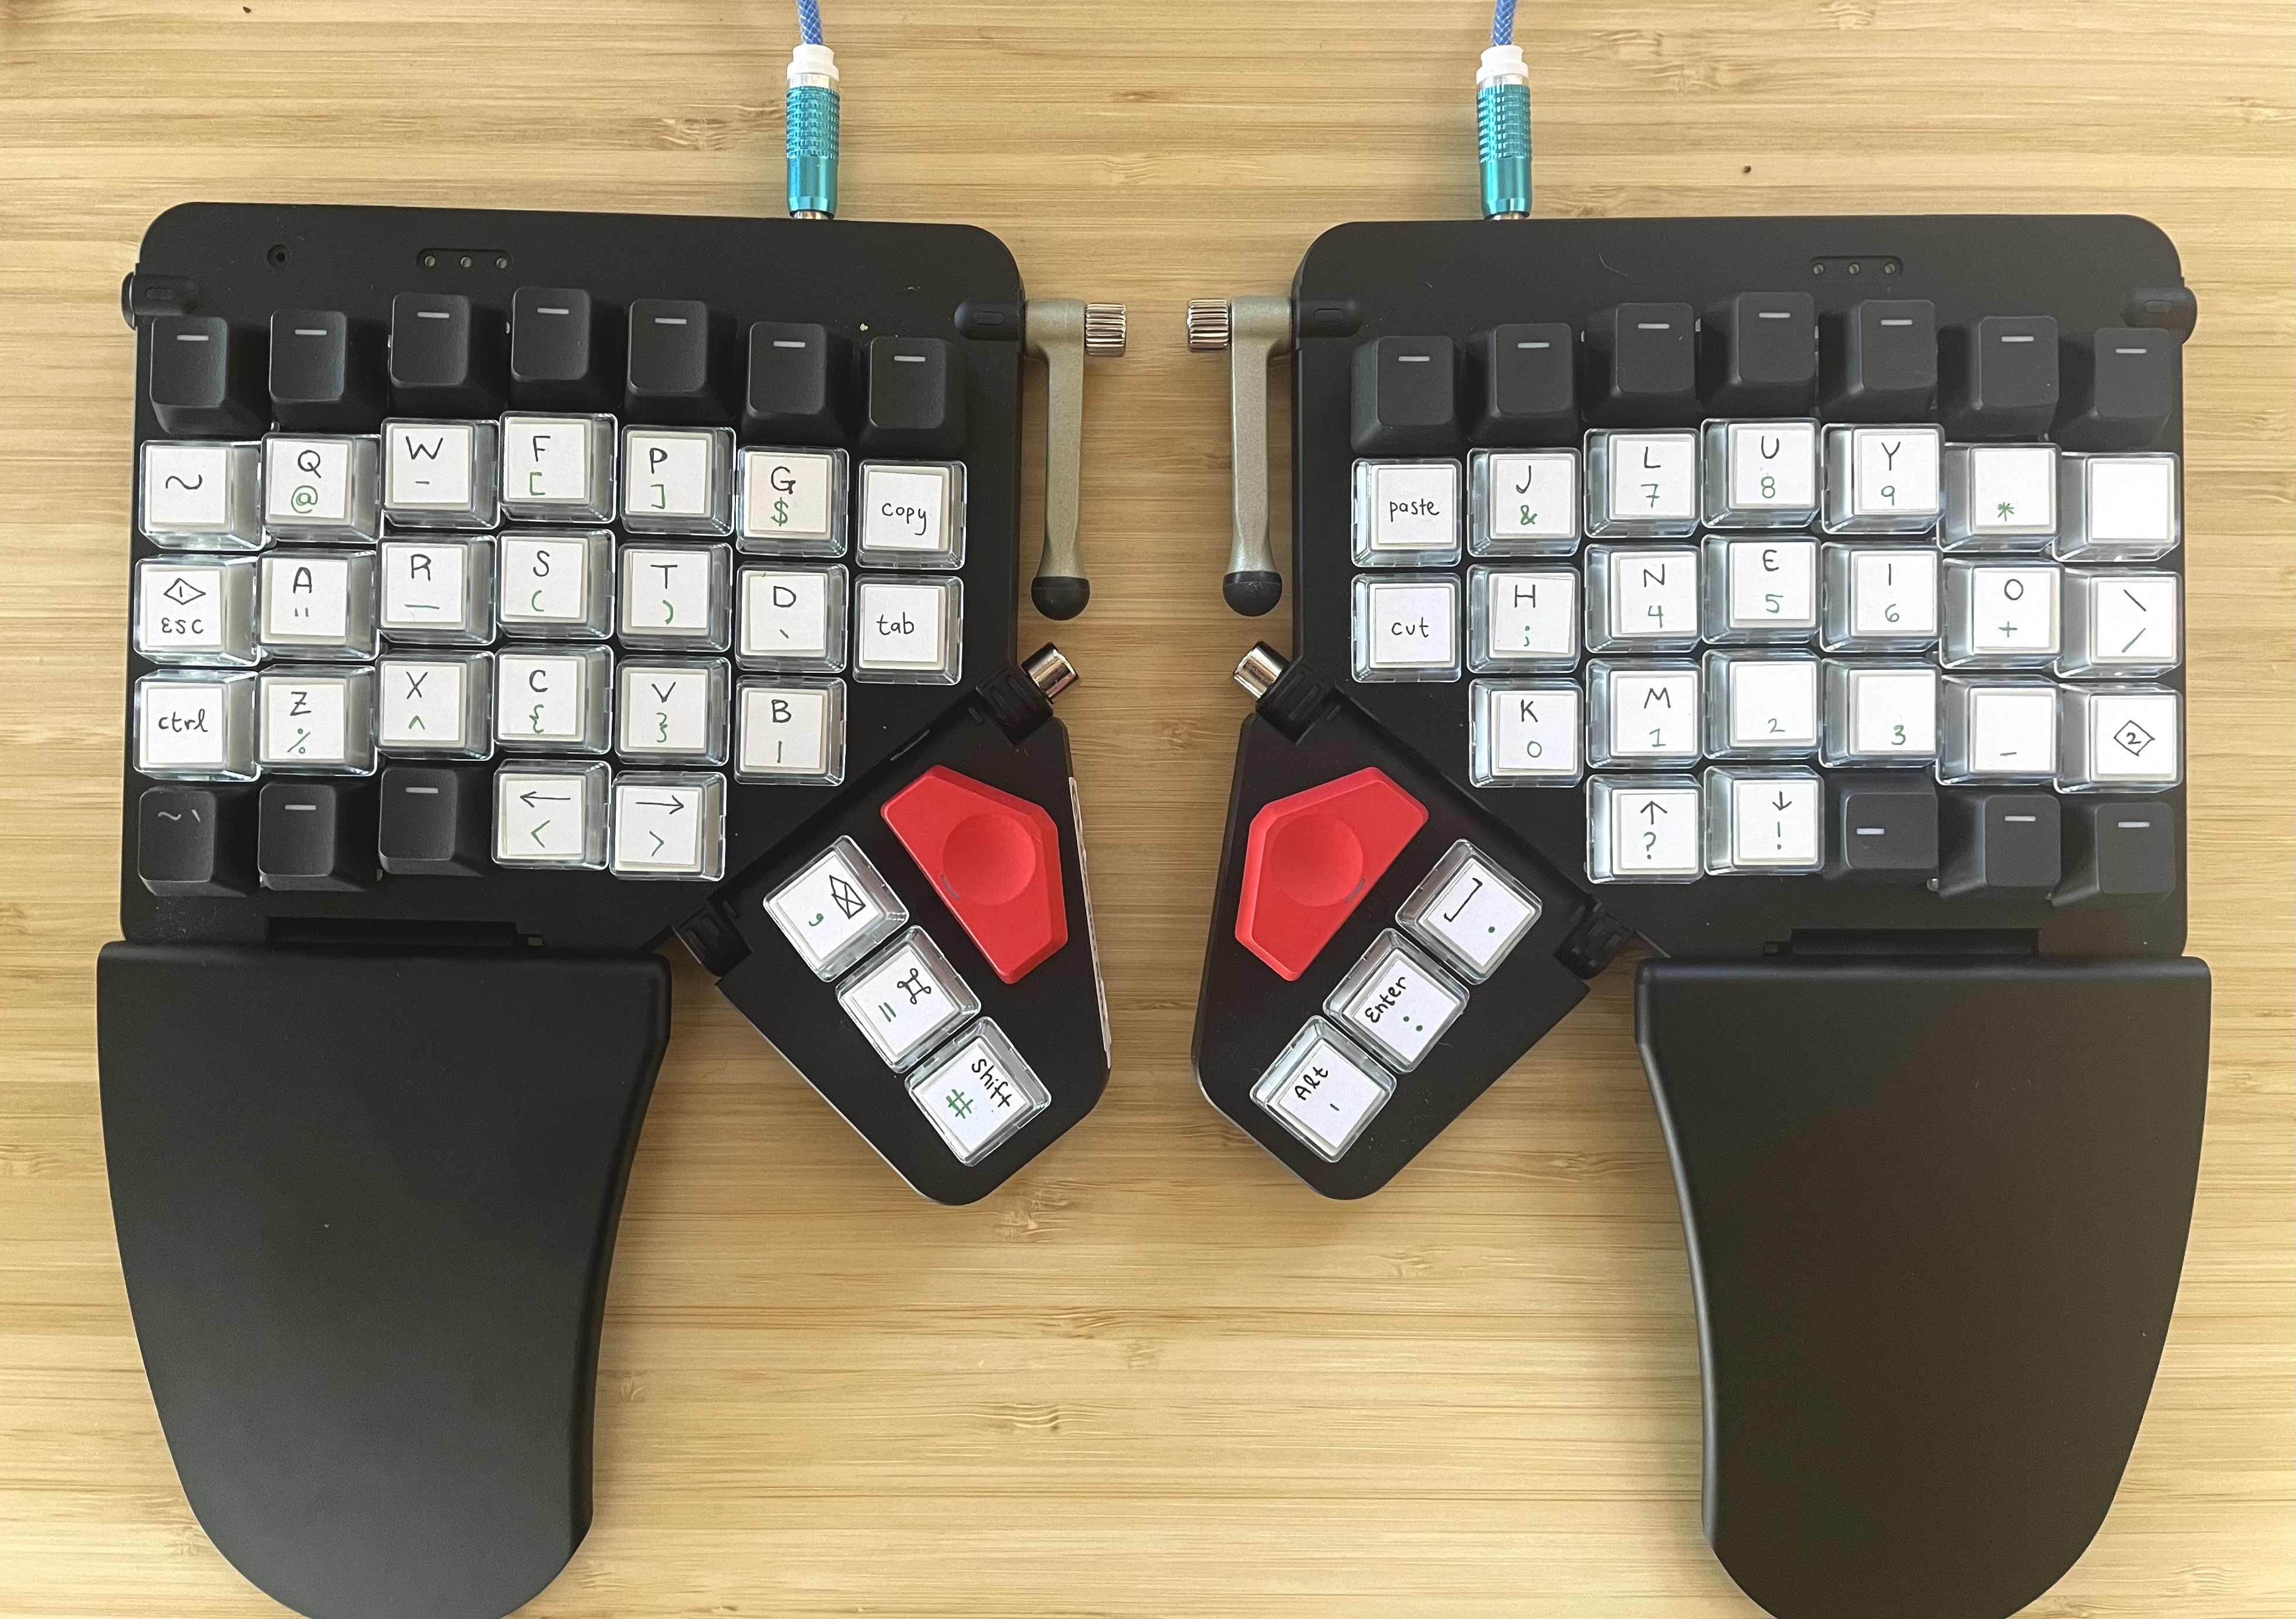
I treat the two mapped keys in the bottom-most row on each keyboard half as an extension of the thumb cluster; I type those keys with my thumbs.
I also have a few hard-to-reach keys mapped to macros:
- the fun big red thumb buttons. The left one opens my dropdown terminal, and the one on the right creates a new todo item in my todo list app of choice
- the two keys in the inner-most column on each side. These are mapped to copy / paste / cut / spotlight search.
I type all these macro keys infrequently, and never mid-thought / in conjunction with other keys.
Keep it simple
As I showed above, I have 3 layers, which are really more like 2 layers and a tiny 3rd layer. On each layer, each key is only in one spot.
I don’t map any keys that I don’t need. On the standard layout these include:
- the duplicate modifiers right-command, right-shift, right-option
- caps lock
- function keys
- the function key overlays to control screen brightness & pull up the control center
- the fn key
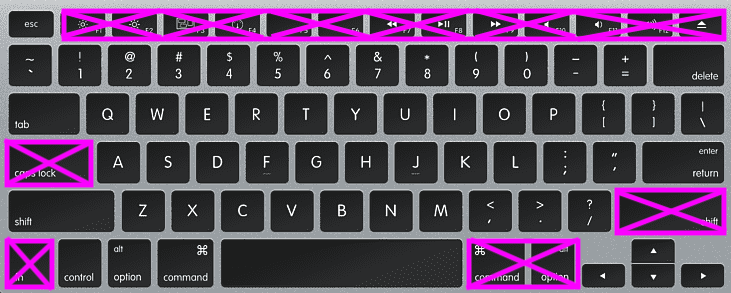
Do you ever type function keys? I do not. Why map keys you don’t use?
I find that duplicating keys and putting them in multiple spots just-in-case ends up being too clever for me. It’s easier to learn a layout where each key is exactly in one spot.
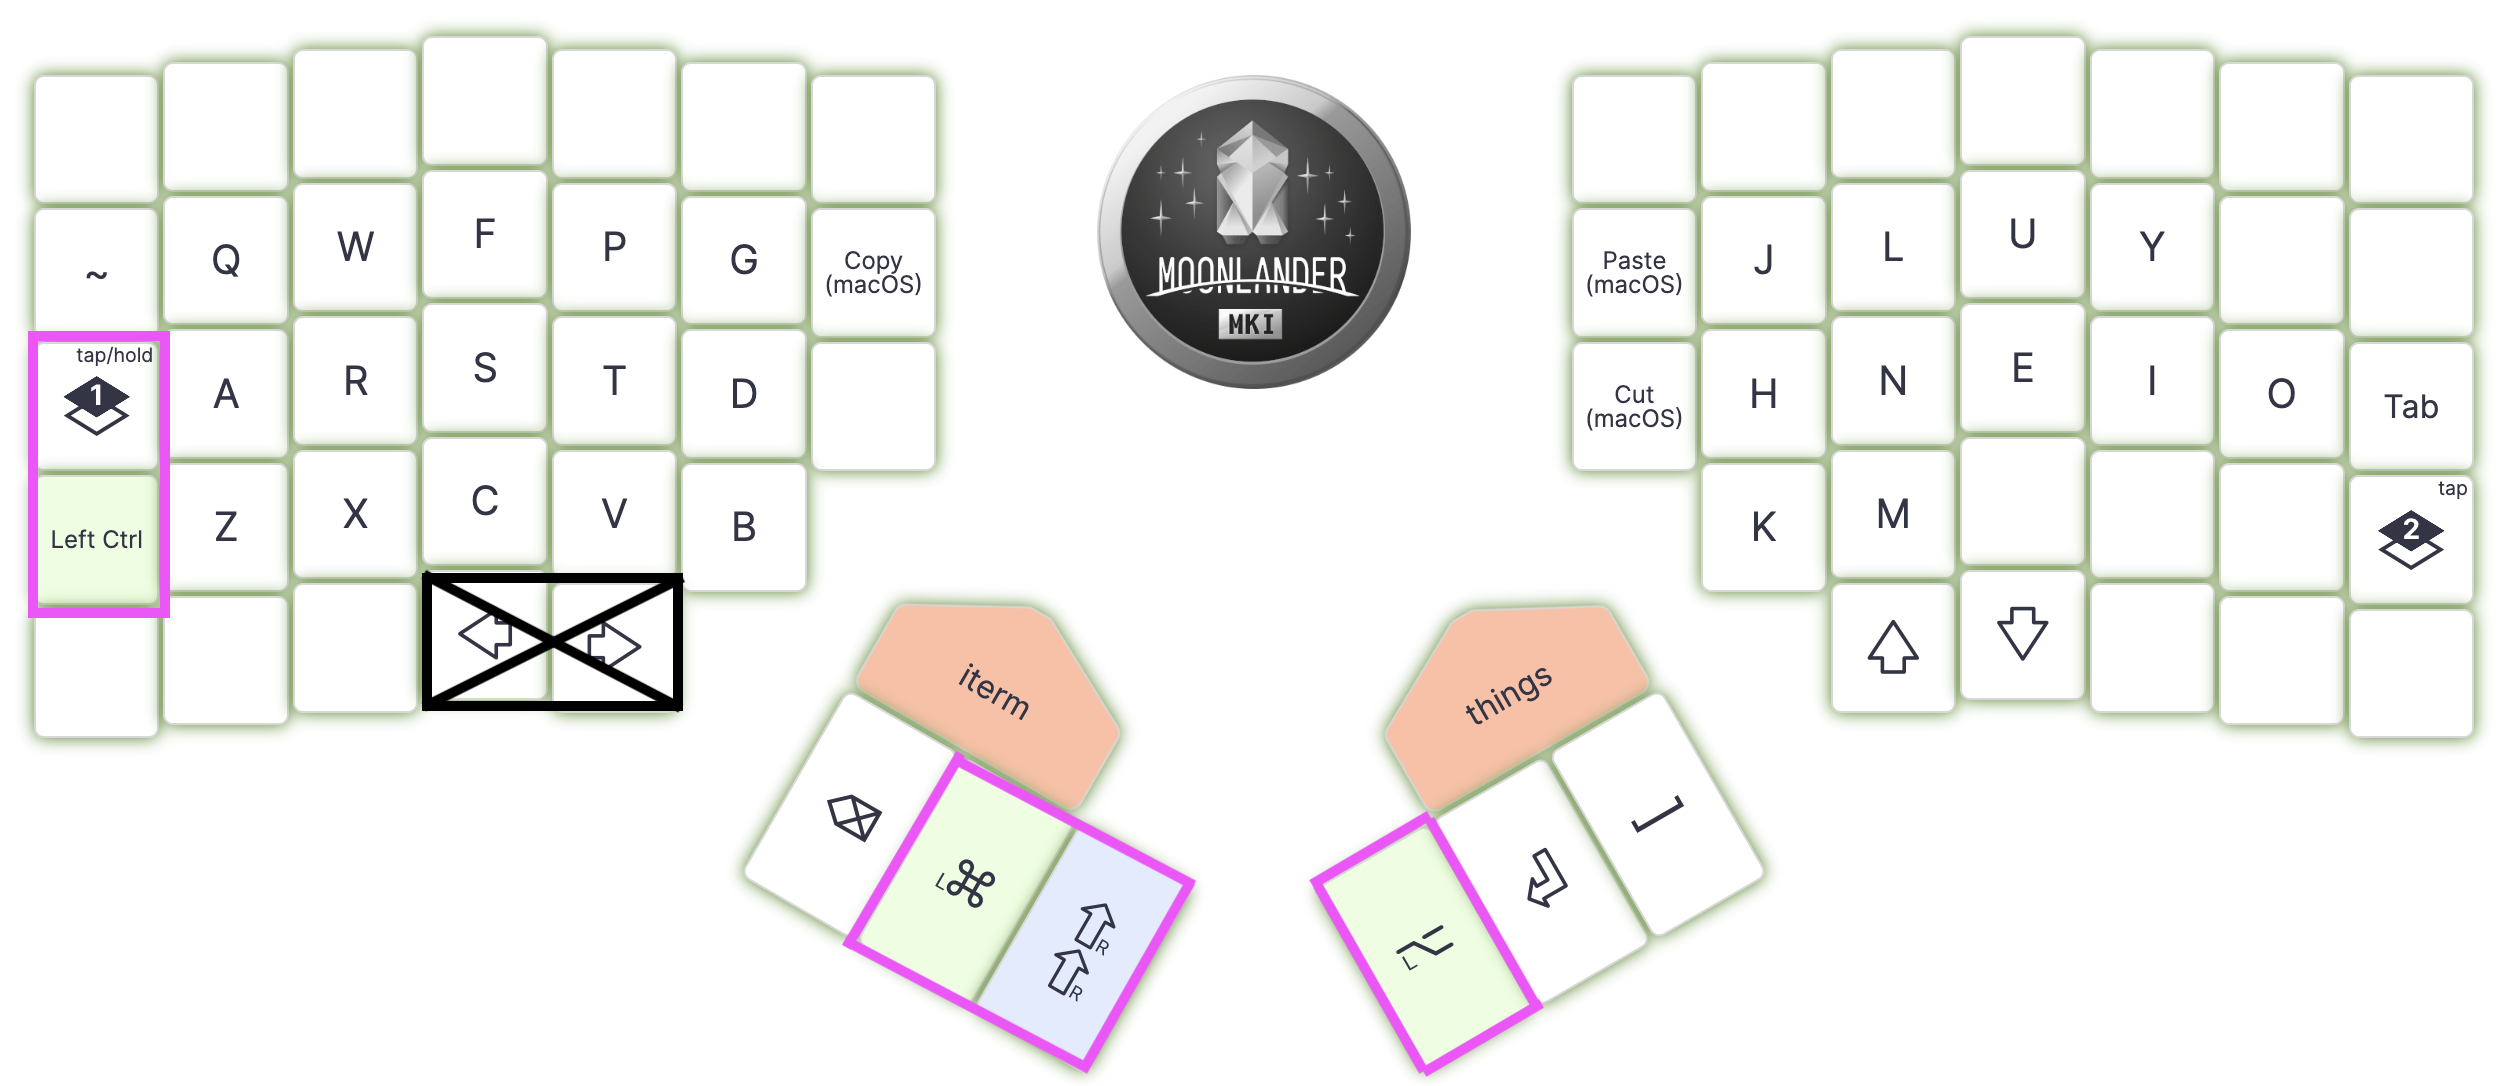
I have one duplicated key– the character - is mapped twice. Once it is conceptually a dash on the left side, place adjacent to the underscore key, and it is mapped again conceptually as minus on right side, adjacent to all the other arithmetic operators.
Place the most commonly used keys in the hottest spots
Here is my opinion about key positions ordered from best to worst:
- thumb cluster keys, in order from outside in
- home row keys, in order from inside out
- keys within one of the home row, with a slight preference for those above than those below
- the two keys on the bottom row closest to the thumb cluster (I also type these with my thumbs)
- all other keys are too far away
I looked at 3 things when thinking about my layout:
- which keys do I type in combination with one another (where do I place modifiers?)
- how often do I type keys
- which keys are conceptually similar
Assigning the base-layer thumb cluster
The first question is which keys to put on the thumb cluster on the base layer. I chose:
- space
- enter
- backspace
as my most frequently typed keys. I then chose my three favorite modifiers to fill the remaining slots:
- command
- alt
- shift
This left control and layer-1 to map on the base layer. I decided it wasn’t worth bumping any alphabetic keys out of position to get a better position for these characters, so I put them both within reach of my left pinkie in the shift and caps lock position on a standard keyboard.
Additionally, I wanted to make sure that I could type all the modifiers in combination with one another. This meant that I could not put control in the place where I have right-arrow mapped, because I also hit that key with my left thumb, which would make it impossible to type control and command at the same time. I have command and shift next to each other, and when I want to type them simultaneously I type them both at the same time by pressing my thumb down between them.
Assigning the special-character-layer thumb cluster
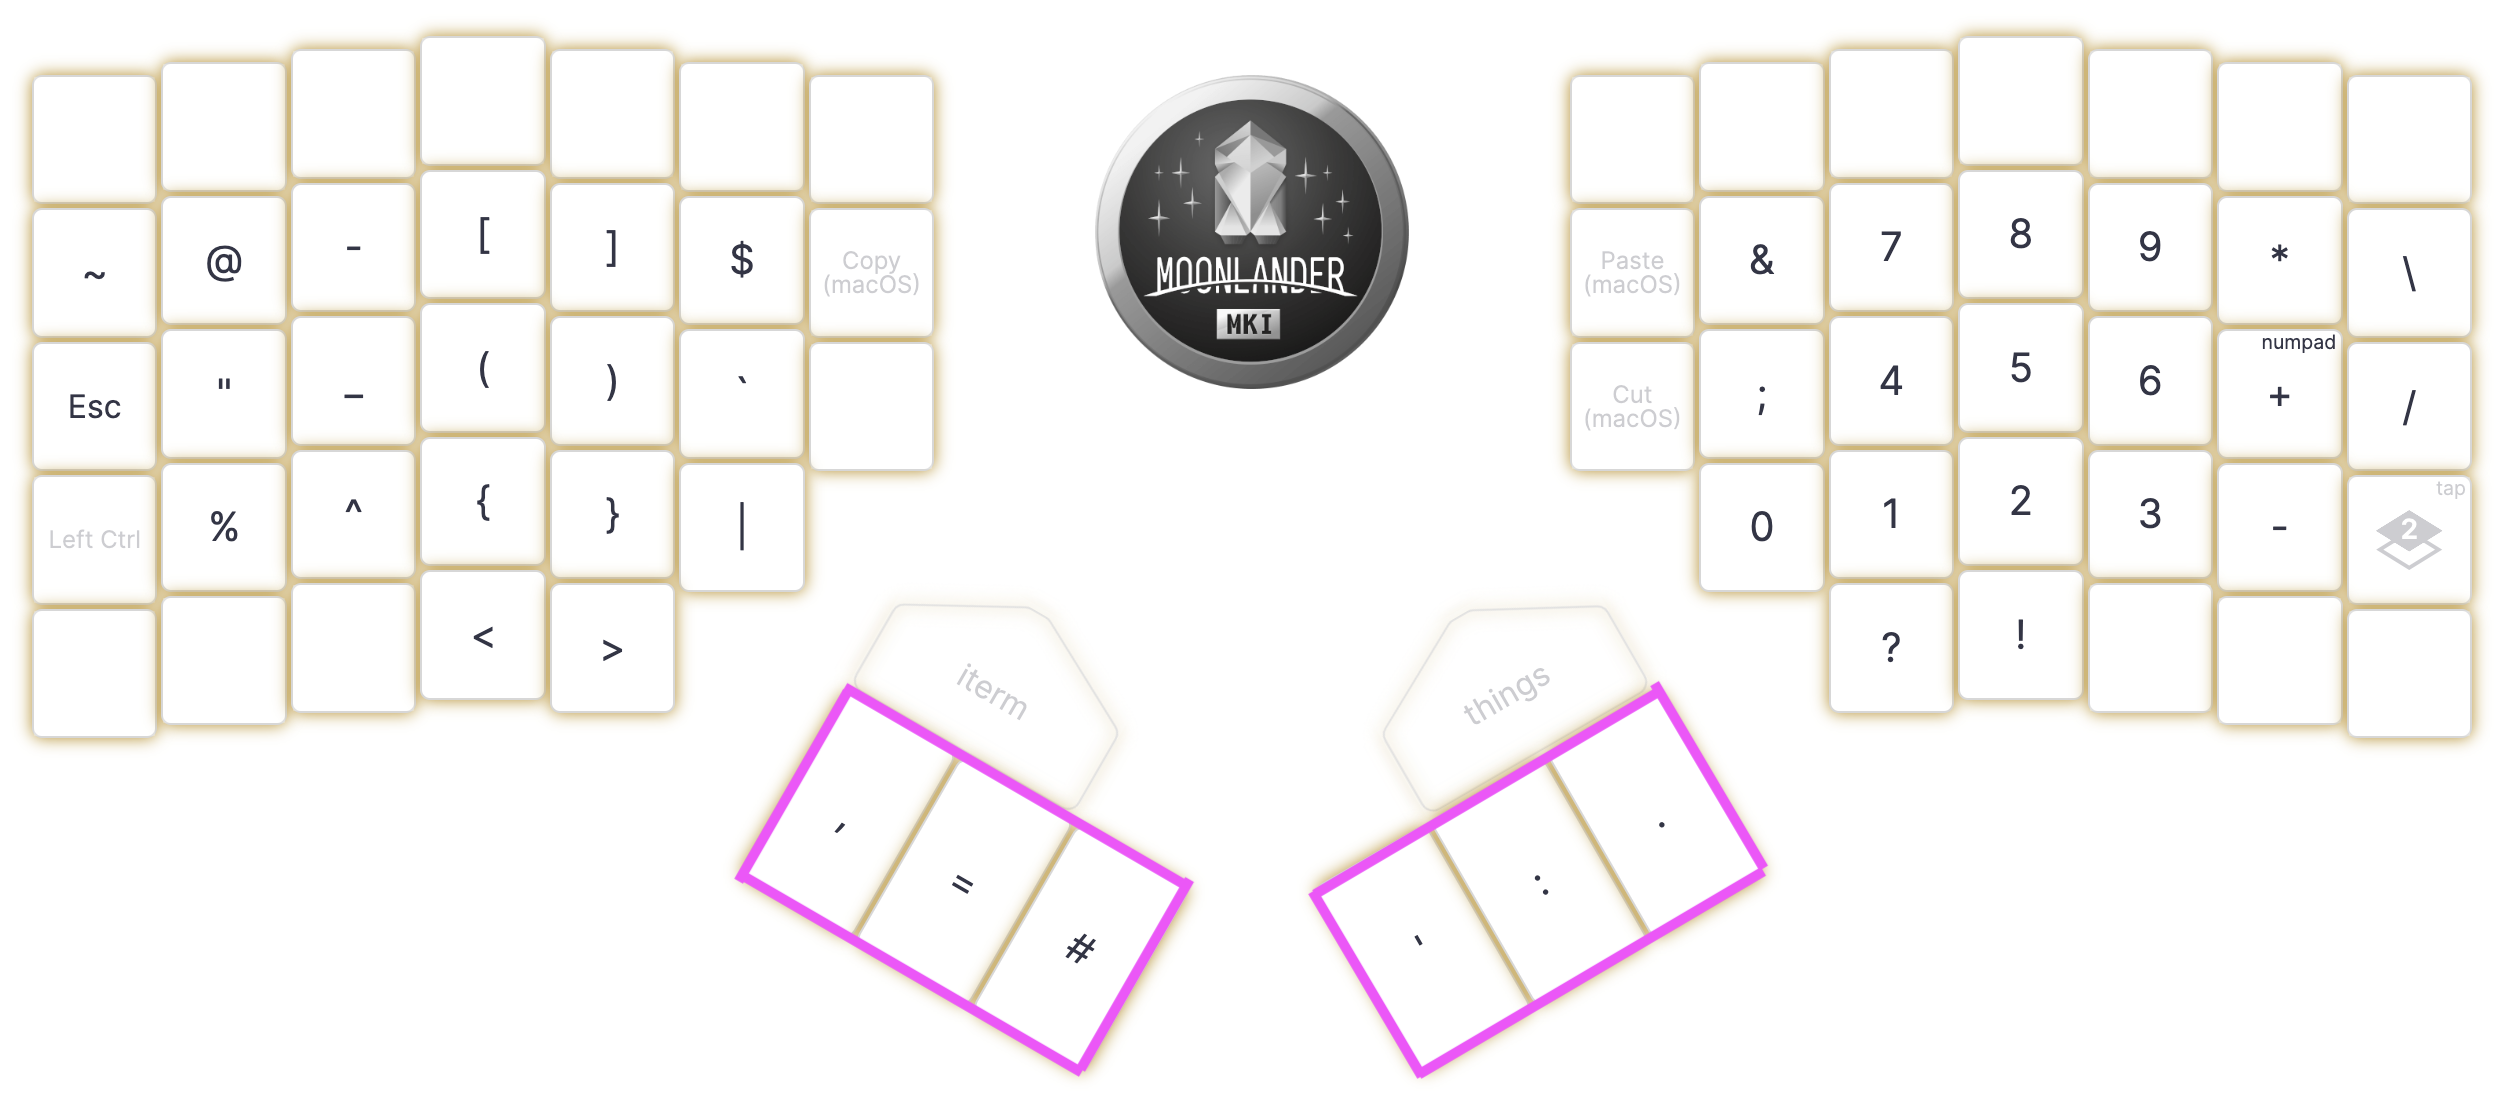
I made a roughly ordered list of how often I type various special characters in both prose & code. It was ordered something like:
- period
- comma
- apostrophe
- double-quote
- pound, equals, colon
- question mark, exclamation point
- underscore
- semi-colon
- parens, brackets, curly braces
This was flavored by my writing predominantly python code, which is why I favored pound (the comment character) and underscore (snake_case naming convention).
I put my top two choices onto the outside of the thumb cluster, which is where my thumbs rest, making them the top choice key positions in the layer. I switched from using double-quotes to using single-quotes in python for strings, which let me bump double-quote down the priority list when making placements. I then mapped the next 4 top keys to the thumb cluster.
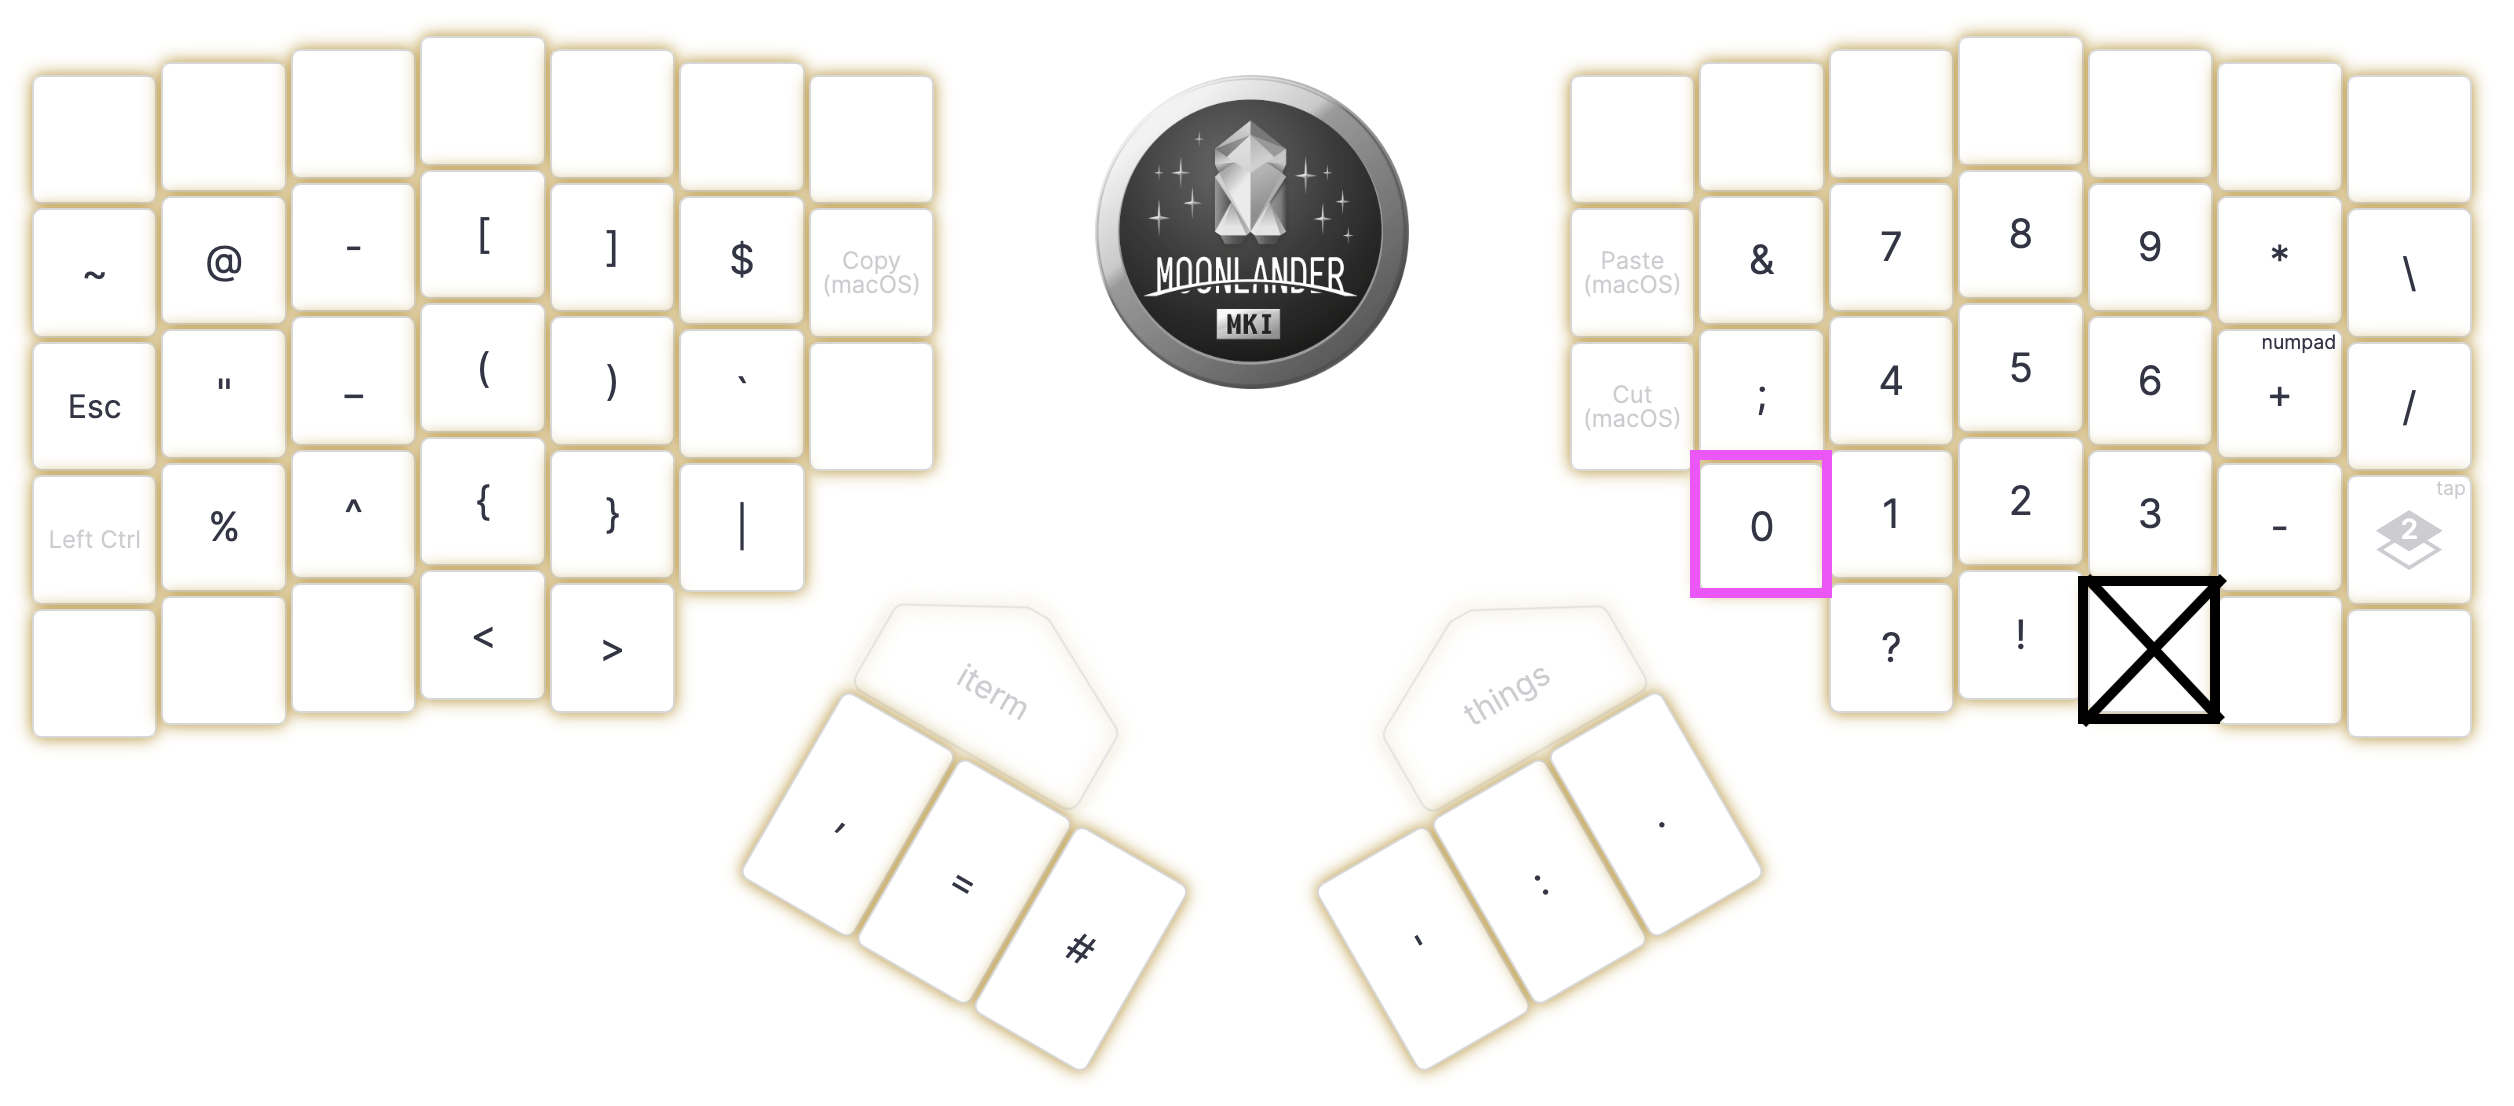
To lay out the rest of the special-character layer, I first blocked out the number characters into a numpad arrangement, same as the default layout. I often type 0’s (more frequently than any other number even maybe!) so I bumped the 0 from a hard-to-reach far-right-bottom-row location on the default layout to a much more accessible spot.
I then tried to group keys conceptually in the remaining space, again starting with the default layout and riffing on it to adjust to my uses. I order the placement of the grouped keys with the most frequent members of the grouping going on the home row, followed by the priority ordering: above home row, below home row, two below home row. Finally I filled in the remaining spaces with the remaining one-off keys.
Grouping conceptually similar keys
Here are a few examples of grouping keys together conceptually.

Brackets I kept the parenthesis, bracket & curly brace placement of moonlander’s default layout, and I added the angle brackets in the spare space beneath to group them with all the other bracket-like-characters. Taking the analogy one step further, I mapped the left/right arrow keys onto the same physical keys as the angle brackets, but on the layer below.
![]()
Arithmetic Same story, I started with the default layout, but because I frequently type forward-slash (aka the divide symbol) while typing filepaths, I bumped it to an easier-to-type location on the home row rather than below it. I then moved the minus symbol to fill in the arithmetic column. Then I grouped the other slash, back-slash, into the position adjacent to foward-slash.
Process notes
I wrote a bit about my experience switching to colemak here, but that was more at the level of typing tutors. I also did two things in the physical world to make learning (and iterating on) my keyboard layout easier. One was labeling the keys, made easier by the specific keycaps I bought, and the other was creating a diagram which I could look at instead of at my hands.
This seems obvious in retrospect, but I was pretty hesitant to label the keys, and then struggled with how to label them in a way that worked, which is why I mention it here.
Keycap labels
I first tried to label the keys in a lot of ways that did not work. I started with sticking tiny cut out post-it notes over the keys, followed by attempting to tape those on, followed by blank keycaps that I tried to label with sharpie and nail polish. None of those worked.
The thing that did work was these keycaps. The keycap comes apart into two parts and lets you slip in a piece of paper between the layers so you can easily label the keys. They work great, and it’s an aesthetic bonus to have my keyboard annotated in my own handwriting.
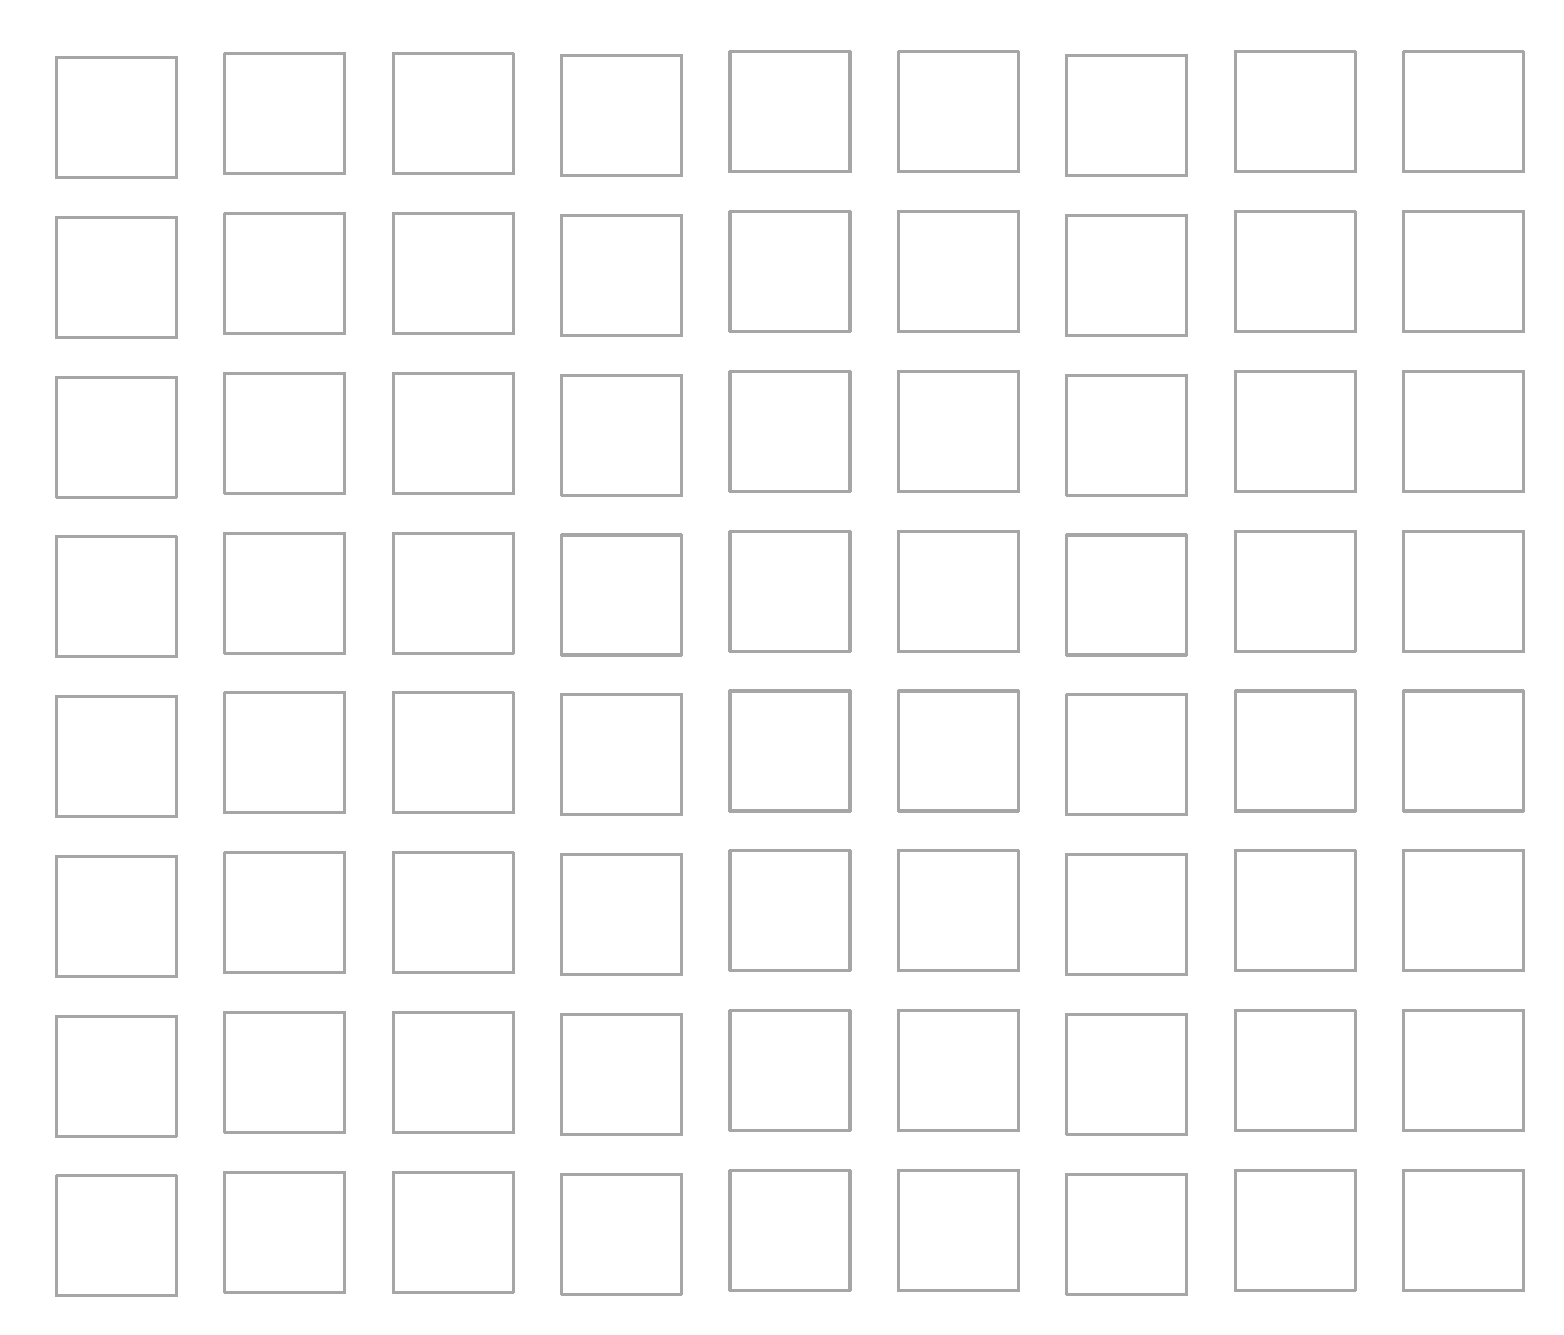
I printed out a square grid, labeled the squares, cut them out, and put them in the keys. Here is my grid template. If you use it check your printer resizing settings to make sure it prints at the correct size for your caps. It looks like this:
Key-map
The other thing that I did that I found helpful was I printed out a blank key-map, filled it out, and color-coded it by which finger should hit which key to make it easier to read at a glance. I taped it to my monitor and looked at the keymap rather than my hands when I was going through typing tutors.
One advantage of setting up a simple keymap– one where keys are not repeated, and one with only two layers– is that creating this visual reference was pretty easy. I imagine it would have been much more confusing if I had more layers. I didn’t include my audio layer on this map because it was so minimal that I didn’t need a reference.
Here is the blank keymap template, and an example of what my filled in one looked like:
![]()
Appendix
Moonlander
I use a keyboard called ZSA moonlander. It’s my favorite keyboard that I’ve tried, hands down.
Things I like about the moonlander:
- The UX for trying out new layouts is exceptional. ZSA has a drag-and-drop layout tool called oryx which I found very easy to use. Once you have a layout it is also very easy to flash it onto the keyboard. The toolchain rocks, and it makes it so much easier to iterate on layouts.
- It has large thumb clusters. The hypothesis is that your thumbs are strong, so it makes sense to have them type many common characters.
- It is fully split so I can adjust the halves to be exactly where I want them to be.
- It is portable, because it is flat and is split into halves. I like to take my keyboard with me when I go on longer trips. I use a laptop stand, my mouse and my keyboard on kitchen counters to create a reasonable standing desk.
Other keyboards
In the past I’ve also used an Iris keyboard from keebio and a kinesis advantage.
I love my Iris keyboard, but it was much harder to configure so I never really got it to the point where I was using it as my goto keyboard. It was fun to solder it together and use the open-source toolchain QMK. Keebio has great build guides, a great first-timers guide to mechanical keyboards, and great diy hardware-hacking vibes. The Iris is a lot less batteries-included + polished than the moonlander, and just a tiny bit too small for what I like. Looking at my current layout I would need 2 more keys on each side of the Iris to make everything fit. At the time I built my Iris I didn’t think to label clear keycaps so I had a really hard time learning where I had put which keys. Not seeing the keys combined with the less polished toolchain for modifying the layout made working with the Iris substantially more challenging than working with the moonlander.
I’ve also previously used a kinesis advantage. At the moment I prefer the moonlander because it is more portable and the toolchain is smoother, but I also loved the kinesis advantage for the two years that it was my goto keyboard.
There’s a whole rabbithole of custom keyboards for those who are curious about it. People have thought about everything from shape, layout, input controls, keycap design, switch design, toolchains, and manufacturing toolchains.
Colemak
Colemak is a layout that has alphabetic keys laid out in approximately priority order, but also geared towards keeping uncommon characters in the same position as on the standard qwerty layout to make it easier to switch. Colemak in one of the pre-installed layouts on mac & linux, and easy to install on windows, so it is low-effort to install on a new machine. I wrote about my experience with switching to colemak here.